


The challenge this week was Time-lapse Photography. I chose this topic since I recently attended a time-lapse photography course offered by Kristin Repsher. It was my first time trying time-lapse photography, and her course a great introduction to it 🙂
Here is a time-lapse I took of a city street in Calgary during the course. Click on the image to play the time-lapse video.
[huge_it_videogallery id=”2″]
Here are a few tips on time-lapse photography that I picked up at Kristin’s course:
- Choose subjects that move, such as clouds, water, traffic or people.
- Use a tripod! You do not want to touch your camera while it is taking time-lapses.
- Take a few test images first to ensure your composition, depth of field of field and exposure are optimal.
- Shoot on manual. You might get a disturbing flicker effect if you shoot on aperture priority.
- If there are clouds periodically covering the sun, expose somewhere in the middle between the sunny scene and the cloudy one. This will help you to avoid overexposing the sunny frames and underexposing the cloudy ones.
For more info on time-lapse photography, I highly recommend taking one of Kristin’s courses. Her time-lapse course was a nice mixture of classroom time where we learned the various time-lapse settings for our cameras, time in the field taking several time-lapses in different locations, and then additional classroom time learning how to process our time-lapse photos.
Editing the Photos
I imported my photos into Lightroom and did my general editing there. Make sure you remove the test photos, as you do not want them to show up in the time-lapse. A handy way to tell which ones were the test photos is to see when they were taken – if they were taken at a different interval than you were shooting the time-lapse (e.g. your interval between photos was 5 seconds and they were taken 12 seconds before), then those are your test photos.
Lightroom has a really handy feature that allows you to sync all of the your changes from one photo to the rest. Rather than edit 250 photos individually, and attempt to ensure the edits are identical, use the sync function while in the develop module of Lightroom to paste your changes from one photo to the rest of them.
You can edit general features of the photo as usual, such as exposure, saturation, sharpness, etc. However, Kristin recommended avoiding using the shadows & highlight sliders in Lightroom, as they can lead to a disturbing flicker you sometimes see in time-lapse photography.
Photos should be sized to a typical video aspect ratio, which is 16:9 or 1920 x 1080.
Creating the Time-lapse
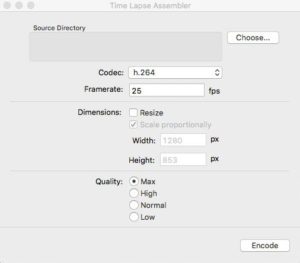
There are several options for post processing your time-lapses. One free option is the program Time Lapse Assembler. It is a simple program and easy to use. Below is a screen shot of the program with some of the settings suggested by Kristen:
LRTimelapse is another program you can use. It is more robust and I found it gave better quality time-lapses. My time-lapses using Time Lapse Assembler were blurry when the video was enlarged on the computer screen and also blurry on You-Tube, while the same pictures used in LRTimelapse were crisp and clear in the time-lapse video. It could have just been a mistake with my settings though, so you may want to play around with both programs.
LRTimelapse has a free trial version and that is what I was using for the above time-lapse. You do not get access to all of the features in the program, but it still worked well. It does seem a lot more complicated to use than Time Lapse Assembler. I found a great video by Raiatea Arcuri that walks you through the process.
Happy shooting, and I hope you give time-lapse photography a try!


leave a comment