


The challenge this week was Fantastical. I chose this topic since I knew I would be exploring the Calgary Comic Expo this past weekend. It’s a perfect place to practice street photography – over 2500 cosplayers dressed up in amazing costumes this year! These cosplayers often invest a great deal of time and money into their costumes, and are more than willing to pose for photos. Here are some of my favourites from the weekend:


A few tips from this weekend’s photo shoots:
Blurring the Background
I recommend using a shallow depth of field (large aperture) to blur the background and bring the focus in on your model. A messy, distracting background can often be a challenge at these events – from cars in the parking lot, brightly coloured cosplayers milling around in the background, buildings, signs, light posts, etc. One way to minimize these distractions is use a shallow depth of field. I found an aperture of 1.8-2.8 worked well for my portrait shots this weekend. Note: if you are photographing a group of people, you may need to reduce the aperture in order to get everyone in focus.
Other ways to blur the background:
- use a longer focal length
- get closer to your subject
- increase the distance between your subject and the background (often not possible at these events)
- convert to black and white (removes all of the chaotic colours in the background)
Lighting
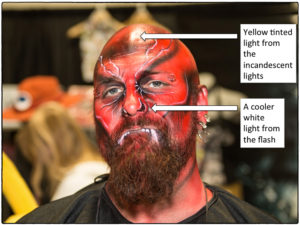
Lighting can also be a challenge at these events, especially if you are shooting inside with flash. Your flash has one colour (usually a temperature close to daylight) and there are either incandescent or fluorescent lights indoors (each have their own colour temperature). The combination of colours from the mixed lighting sources can mess with your white balance. For example, in the photo below, there are two types of lighting – the incandescent lighting, which adds a bit of a yellow cast to the top of the model’s head, and the cooler white flash on the face. The flash white balance setting was used in this photo.
I did a little reading before this event, and found that you can minimize these mixed lighting effects by using gels on your flash. This makes the light from your flash the same temperature as the light from the incandescent or fluorescent lights. And voila – you end up with a single light colour rather than two. I don’t have any gels yet, but I do have two filters that came with the flash – one for incandescent lights and one for fluorescent lights. These can be used like a gel on your flash. Unfortunately the temperatures of the fluorescent lights and incandescent lights can vary, and I wasn’t completely satisfied with the effect of the filters. However, I did find that I could improve the white balance in Lightroom after the fact, since my photos were in RAW format.
Also, converting to black and white can help you get around the dual light effect. The only downside is that you lose the colour, which can be an internal part of the costume…
Camera Settings
Make sure you are checking your settings as you enter & leave the buildings. I use different settings inside compared to outside – in particular a different ISO and white balance. It’s easy to forget to change your settings when you get caught up in the event. I did this when I first started photographing events, and lost quite a few photos due to them being either being majorly under-exposed or over-exposed.
I find shooting on Aperture Priority setting helpful at these types of events. You can set your ISO and your aperture (wide open to let more light in and to blur your background). The camera will then adjust the shutter speed for you and will properly expose your photo. This comes in handy when light conditions are changing – such as when the sun goes behind a cloud just as you are about to take your shot. The only caution I would mention here is that your ISO must be high enough to prevent the shutter speed from going so low that you end up with blur due to camera shake. Alternatively, you could shoot in Manual instead – if you do this you will have to be very quick with changing your settings before taking each photo. It can be hard to do if you are trying to capture candid street photography shots – you might end up missing your shot while you are adjusting your camera settings!
Lens Filters
I experimented a bit with my ND filters this weekend. Many people think an ND filter is only used for landscape photography, but it can also come in handy for portraits. In particular, when the environment is too bright to allow a wide-open aperture and you are shooting with flash (flash that does not have high speed sync, like mine). In this case, even an ISO of 100 and a shutter speed of 1/200 second can give you an over-exposed photo on a sunny day. The ND filter reduces the amount of light entering your camera and allows you to still use that wide-open aperture.
You also have the option of not using flash and going with a faster shutter speed, but I find flash helpful in removing unwanted shadows from the face. You could also use a reflector to bounce light into the face, but sometimes the glare can cause your model to squint.
Providing Photos to Cosplayers
Be prepared at these events for cosplayers to ask for copies of your photos in exchange for allowing you to photograph them. I usually carry around some of my business cards to hand out, and some of the professional cosplayers have their own cards with their contact information.
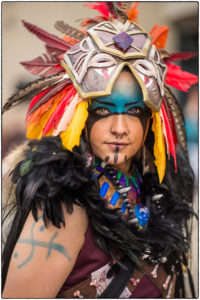
It occurred to me after I wrote this blog post that I should also be crediting the cosplayers who gave me their cards! Of the photos included in this blog, only one gave me her card. Thanks to Limitless Dreams Art & Cosplay for letting me take photos of her 🙂 Such a cool costume (see below)! And thanks to all of the others who let me take their photos too!
Have fun at your next event!


leave a comment